 Everything you need to know to make your own gills (yes, fish gills) in your kitchen
So you’re going to a costume party/comic-con/the grocery store and you’re searching for a look to give you the edge over that guy wearing a note that says “FYI, I’m a fish” because no one can tell what he is? Fear not. Grab a friend or four, chip in to buy a few supplies and have a prosthetic-making gathering in your kitchen. You will likely need about three and a half hours to fashion your own set of gills (including bake and refrigeration time), and then about one hour to situate them on your neck. This means dedication is ingredient number one.
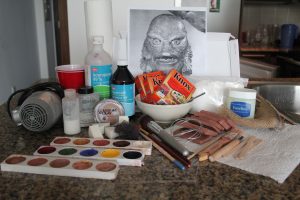 Step 1: Find a reference picture
Search the Internet and find a cool picture for inspiration. Steve Kostanski (the make-up effects artist guiding me through this) chose an image from Creature From The Black Lagoon. After you learn this technique you don’t have to make gills all the time: you can make horns, a neck gash or even a star growing out of your forehead — it’s up to you. This process works best when making things that will be attached to a relatively flat surface (i.e. forehead, cheeks, chest).
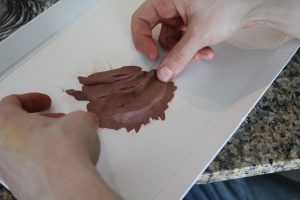 Step 2: Sculpt the gills out of clay
Tools needed: a piece of smooth cardboard (e.g. a shoebox lid), some modeling clay, objects to help create texture (e.g. popsicle sticks, toothpicks), a wide paintbrush, 99% Isopropanol (from the drugstore)
– Take small pieces of clay and press them onto the cardboard as you begin to shape your new improved look. Roll the clay between your palms to heat it and make it easier to mold. Spread out the clay on the edges with your fingers and feather it so that it is only two to three millimetres thick at the outer edges.
– Once you have the basic shape, use a popsicle stick to create grooves in the sculpture. Use a toothpick to create more definition and to outline the flaps of the gills.
– Brushing steel wool, a stipple sponge, or any rough item along the clay will create texture. If you choose, you can wrap two pieces of metal wire together, and then bend them into a small loop. This makeshift tool, called a “rake,” can be rubbed against the sculpture to add texture.
– Take a wide paintbrush and paint the sculpture with 99% Isopropanol to round and smooth.
When you have finished your first sculpture, create its mirror image on the cardboard next to it. Now you have a gill for each side of your neck.
Step 3: Make your molds
Tools needed: Vaseline, plastic or disposable container, warm water, two cups of Hydrocal white cement or plaster of Paris, popsicle stick, burlap (enough to cover your two sculptures), scissors, wide paintbrush, 99% Isopropanol, an oven
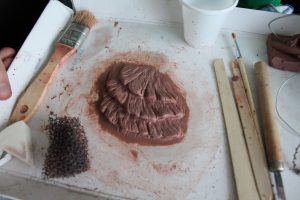 – Rub Vaseline onto your sculptures. This will help to release the molds once they have hardened.
– Cut two round pieces of burlap that will fit approximately over the gills without going over their edges. The burlap will strengthen the mold so it will remain in one piece. Set aside.
– Run one cup of warm water into a plastic container.
– Add two cups of white cement or plaster to the water. Add it slowly to allow the water to soak into the plaster. (NOTE: These instructions are for white Hydrocal cement. The ratio of water to powder varies with different types of cement or plaster. Check the instructions on the kind that you purchase.)
– Mix with a popsicle stick (or anything disposable) for about one minute.
– Pour the cement over each of your clay gills. The first coat should be very thin and is known as the “splash coat.” This coat should get in all of the nooks and crannies and helps to prevent bubbles from forming in the mold. Use the popsicle stick to spread the cement over your sculptures.
– Blow on the splash coat to help release some of the trapped air.
– Make sure that the mold extends at least ¼ inch past where the gills’ base ends.
– Add more cement to create a thick coat over your splash coat and leave to set for one minute. (NOTE: The following setting times are for white Hydrocal. If you use a different kind of cement, do a test beforehand as thickening times may vary).
– Dip your burlap in cement. Rub the excess off with your fingers. Place a piece of burlap over each of your molds.
– Wait two to three minutes for your cement to thicken.
– Add a last finishing coat of cement to your molds. Use a popsicle stick to smooth the molds out and make the tops flat so that they will lay flat when turned over.
– Leave molds for 15 to 20 minutes to set completely.
– Once the molds have completely hardened, pry them off of your cardboard.
– Use a wide paintbrush to brush the insides of the molds with Isopropanol to clean them. Then, rinse under the tap while brushing out the molds with your paintbrush.
– Place the two molds in the oven at 125 degrees for one hour. This helps to bake the moisture out of the molds. These molds can be re-used as many times as you want.
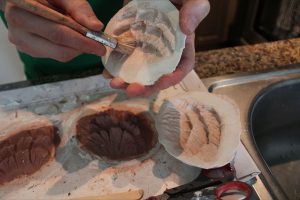 Step 4: Make gelatin and fill your molds
Tools needed: bowl, spoon, glycerin (from drugstore), three boxes of gelatin powder (or vegan alternative), cream foundation, a microwave, paintbrush, petroleum jelly, popsicle stick
– Dump all of the gelatin powder into a bowl. Mix in glycerin (Ratio: Approximately three
small packets of gelatin (usually four packets per
box) to 100ml of glycerin). Mix completely. The mixture should be thick and chunky and you should be able to see the granules of gelatin powder. (NOTE: we tried using vegan gelatin alternative agar agar to make a mold and it turned out too gooey. If you go the vegan route, test that it comes out firm enough before going through all of these steps.)
– Place the bowl in the microwave. Heat on high for five or six 30-second increments, stirring in between each. Once bubbles start forming, heat in 10-second increments. Do this until the mixture is quite thin and the granules have completely dissolved.
– Mix chunks of flesh-tone cream foundation into the mixture until it looks more flesh-tone than yellow.
– Place the mixture back in the microwave for 20 seconds. Stir.
– Use a paintbrush to rub petroleum jelly into your baked molds. Make sure you get into all of the cracks.
– Pour the gelatin into your prepped molds until they are completely filled. Make sure there is a bit extra on top. Take your popsicle stick and scrape it right across the mold to create a flat, smooth surface of gelatin. Hopefully, all of the bubbles will rise to the surface at this point. Do not throw out your bowl of excess gelatin.
– Leave the gelatin to set for a few minutes, and then place the molds in the fridge for one hour.
– Gently peel the gelatin gills from the molds. If there are bubbles, you may have to re-pour the gelatin (simply reheat your leftover gelatin in the microwave in increments until it is ready, pour and refrigerate).
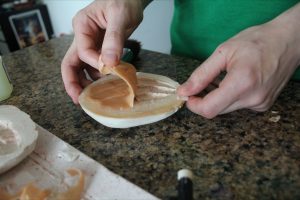 Step 5: Prep your gills
Tools needed: creamy white prosthetic adhesive (found at theatrical make-up stores), make-up sponge, hairdryer, translucent face powder
– Peel off the excess bits of gelatin from the edges of your appliances. Be careful not to peel too much away, because you still want your appliances to have a feathered edge.
– Brush a thin layer of prosthetic adhesive onto the tops of the appliances with a make-up sponge.
– Blow dry.
– Use sponge or powder brush to dab translucent face powder over the adhesive.
– Repeat process for the backs of the gills.
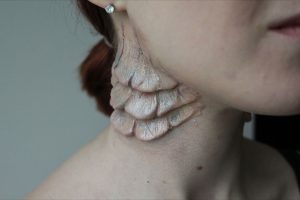 Step 6: Apply
Tools needed: prosthetic adhesive, make-up sponge, hairdryer, cotton swab, translucent powder, powder brush or sponge, warm water (You will also need a friend to help!)
– Apply prosthetic adhesive to one side of the neck and the back of gelatin piece. It should go on white. Blow dry neck and gelatin piece with a hairdryer until the adhesive turns clear.
– Apply the gelatin piece to the neck. Press it on so that the piece is completely attached.
– Use a cotton swab to add bits of adhesive to the neck and appliance at the edges. Blow dry. Press down at edges. Peel off any stray gelatin.
– Use a brush to powder the appliance.
– Dip a cotton swab in warm water. Rub it along the edge of the appliance to smooth out rough edges.
– Use a cotton swab to dab a layer of prosthetic adhesive all the way around the edge of the appliance. Blow dry. You may need to do two layers if the edge does not look smooth.
– Use a make-up sponge to dab powder over the edge where the adhesive has been applied.
 Step 7: Paint your gills
Tools needed: cream foundation, make-up sponge, colourful cream make up (from dollar store, Halloween store, drugstore, etc.), fine make-up brush or paintbrush, shimmery eye shadow, translucent face powder
– With a make-up sponge, apply cream foundation around the edges of the appliance to blend it with the skin.
– Use a fine make-up brush to add coloured cream make-up (we used dark purple and dark green) to the appliance to contour. Accentuate the lines that you have sculpted.
– Use shimmery eye shadows along the edges of the gills to give them an underwater look (we used shimmering blue, green and pink). Apply with brush or sponge. If you prefer, you can keep your look matte and only use cream make-ups. You can use any colour and use as much as you want. Just make sure you blend it away into your skin. Lightly apply face powder.
NOTE: Remove the appliance with cotton swabs and adhesive remover (or Isopropanol, if you are careful). Then use soap and scrub with a face cloth or loofah in the shower.
And voila! Super cool gills for you to… uh… do whatever it is you do with fake gills!
Send us your gills photos at [email protected].
